Updating ExactTarget templates after changes

So, you have several emails and you need to make one change to all of them. If you planned ahead and created a template for these emails, then you’re in luck. Updating and applying changes to templates in ExactTarget is fairly easy.

For this example, let’s update something as simple as the address in the footer.

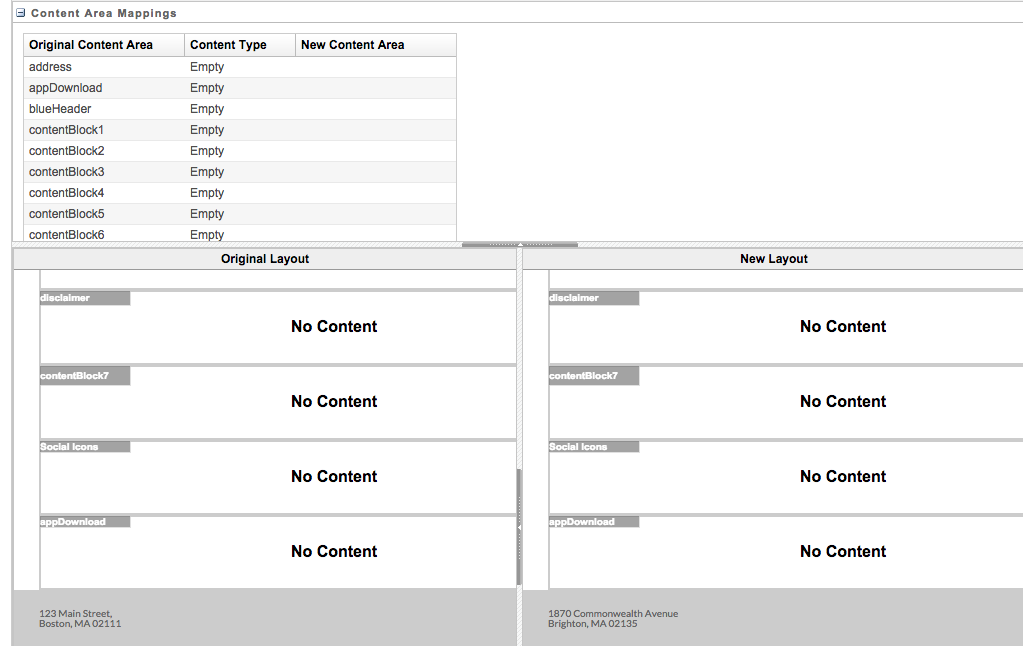
Currently, the address is 123 Main Street, Boston, MA.

address in footer ExactTarget

I just moved to 1870 Commonwealth Avenue, Brighton, MA, so I need to update this information.

To make the edits to your template, navigation to Content > My Templates, and locate the template you are looking to update.

*Tip: Copy the HTML into an editor (Dreamweaver, etc.) and save for a back up.

Make the changes to the template and save.

ExactTarget template code address


Navigate back to the email (Content > My Emails).

Go to the Properties tab:

ExactTarget properties


In the Properties tab, go the bottom and select “Apply Template Changes”

ExactTarget apply template changes

Make sure the content maps correctly before accepting changes:

ExactTarget content area mapping

And you’re done! All of your template changes are now live.

ExactTarget new address in footer

Note that you will need to do this process for every email that is using the updated template – the template will not automatically update.

Using Google Fonts in an HTML email

Using Google Fonts in email is nothing new and is still only supported by a few email clients. However, here is a concise template that you can use that will allow for proper fallbacks and will avoid the Times New Roman issue in Outlook.

1. Include the CSS link in the head of the email. You could also include  the @import URL in the head, however you only need one or the other. I prefer to use the CSS link, as it feels cleaner to me. (line 5)

2. Define your font-stack without your Google Font.  This will cover you anytime the Google Font isn’t supported and will display your fallback fonts. (line 8)

3.Define your font-stack with your Google Font in the td. (line 16)

4. Include !important in the td after the font-family stack. This is necessary for Outlook because Outlook 2007, 2010 and 2013 will all default to Times New Roman. By adding the !important declaration, these versions of Outlook will ignore the font-family stack in the td entirely and default to the CSS style designated in the CSS body style in the head. (line 16)

ExactTarget A/B testing: are email domains split evenly?

While setting up an subject line A/B test in ExactTarget, a potential issue dawned on me: What happens if one of the test groups has a much larger share of Gmail addresses? As we know, Gmail downloads images on it’s servers automatically and therefore those email addresses will count as opens. If one test group had a disproportionally larger share of Gmail addresses, then the results would be skewed.

However, I’m happy to report that this wasn’t the case.

After the A/B test went out, I exported the two separate lists. For this test, there were a total of 94,0002 email addresses.

Here’s the breakdown of the more popular email domains:

Gmail: 12,885 vs. 13,026

Yahoo: 8,818 vs. 8,847

Hotmail: 4,377 vs. 4,321

Gmail still had a 141 difference, which could cause a potential swing of 0.15%, but this is not significant.

Changing your local time zone in ExactTarget

In ExactTarget, by default, the local time may not be set to your local time. For me it was set to CMT. Although you still have the ability to select the correct time zone before you send an email, this can be confusing in reporting.

In Automation Studio, the progress will state the Completed time in the wrong time zone. In the Email tab, under Sends, it will show a SENT ON time in the wrong time zone.

I live in Boston, so I can just mentally add 1 hour so it equates to EST but it can get a little annoying and potentially problematic.

In order to change your default local time, follow these steps:

Selecting Time Zone in Exact TargetIn the top right, go to the drop down from your username and select “Cloud Preferences.”

Under the “User Settings” tab, click “Edit” then go to the “Time Zone” drop down and select your correct local time zone.

And, that’s it! You may need to log out and back in for the change to take effect.